Pinterest

Thursday, December 12, 2013

25 Days of Christmas Books

Recently, I guest posted over at Sugar Bee Crafts on my family's 25 Days of Christmas Books tradition. Thought I would go ahead and share here as well!  Enjoy!  :)

Looking for an easy and meaningful family tradition this Christmas?  Start the 25 Days of Christmas Books and enjoy time with your family during the busy holiday season.


I started this tradition three years ago after my daughter was born.  I did it for two reasons: 1) As my husband and I were starting our family, I wanted us to start our own traditions as well.  2) In the midst of the craziness of the holidays, I wanted to ensure that we had something that would bring us together as a family each and every night.

Plus, I liked that the books would give us a countdown to Christmas (like an Advent calendar), without my kids receiving candy or small trinkets. So, we decided to start the 25 Days of Christmas Books.  


Starting this tradition is really easy to do:  just find 25 Christmas/holiday books, wrap them up and open/read one each day from December 1st to December 25th. Easy right? :)


Finding 25 books might require a little bit of work, assuming you don't just want to buy 25 brand new books at your local bookstore or on Amazon. I picked ours up over the past four years at garage sales, local thrift shops, and from various retail stores. I try to pick up at least one new one each year. Several of them were given to our kiddos as Christmas presents as well. You could also ask your friends and and family if they have some gently-loved books that their children have outgrown. 

Some of our favorites include:


 The Classics

The Childhood Favorites
(so fun to read one of my old books to my kiddos!)


The Reason for the Season
(and another of my childhood favorites)

 Interactive Books
(these Jingle and Bell books are my daughter's FAVORITE! I was so happy to see they put out two new books this year because we read the others at least once a week, year round!)

 Modern Favorites

Books For Every Age

And our two new books for 2013...

If you have more than 25 books, as we do, you could begin on Thanksgiving evening and read a book every night until Christmas.

So just wrap up the books and throw them in a cute basket underneath the tree.  


Most of the time, the hubby, kiddos and I will sit down after the kids have gotten ready for bed and will enjoy a book over a bedtime snack.  Both of our children love to read, as do we, so it's such an effortless yet meaningful part of our night-time routine! 


So there ya go!  Hopefully this will inspire you to start your own holiday tradition! 

Thanks again to Mandy at Sugar Bee Crafts for the opportunity to guest post!  

Wednesday, November 27, 2013

25 Days of Christmas Books: Guest Post at Sugar Bee Crafts

Hey y'all!  I'm really excited to be doing my very first guest post on another blog today!  


Hop on over to Sugar Bee Crafts and check out my 25 Days of Christmas Books, a fun tradition my family started three years ago!   

And wishing you all a Happy Thanksgiving!  Hope you have a wonderful holiday with your families! 

Friday, November 22, 2013

Happy Birthday Balloon Wreath


We have a busy fall around here, especially when it comes to birthdays. We've got one in August, September, November and December. Add in K-State football, Halloween, Thanksgiving and Christmas and we are running around like 'chickens with our heads cut off' for about 5 months."

So, in honor of each person's 'Birthday Week' I made this cute little balloon wreath to hang on the door.  Now, when you pass by the Whitesell household you know when we have a birthday to celebrate! :)


And the birthday wreath is up right now for the hubby's birthday! 


Here we are at a K-State basketball game last week.  I've told you we bleed purple! :)

This wreath is super easy to make.  


The supplies you need for this project are:

  • Foam or straw wreath
  • Floral pins (available at any craft supply store)
  • Balloons in a variety of colors
  • Fabric to cover wreath (optional)
I used a straw wreath for mine, but foam will work fine too. I left the wrapping on my wreath, which worked well. But if I could do it all over again, I would wrap the whole wreath in fabric to ensure that none of the straw will show through at any angle.


So, grab your wreath and start pinning the balloons on in no particular order.  The best part of this wreath is that you just put the balloons on however you'd like.  I used multiple colors so I kind of just threw them on there and didn't really have to worry about colors being too close together or anything. 

Add one...


And then add another...


And a few more...


Until the whole thing is covered...


Isn't it cute?! 

It helps to brighten up my sad little porch... ;)


Enjoy!

And Happy Birthday Joe! :)

Linking up to:  Sugar Bee Crafts' Take a Look Tuesday and A Bowl Full of Lemons' One Project at a Time.

Friday, November 15, 2013

Christmas Card Shutter Display


Christmas is my favorite time of year. I could honestly listen to Christmas music from about September to January. And once Halloween is over, I am begging the hubby to let me decorate for Christmas. There is something about this time of year that just leaves me feeling so happy and so blessed.


And one of my favorite things about the holidays is sending and receiving Christmas cards. Though I always struggled with how to display them...until now.

The first year after we got married the cards were throw in a basket. The second year I tried hanging them over some twine on the wall and that didn't work so well.  

The next two years I tried taping them up all over a wall with painter's tape Becky Higgins' style.  They just kept falling down...and then my toddler kept playing with them.


See?  Plus it doesn't look very full so it was kinda awkward on the wall. 

So last year I decided to DIY a solution to my Christmas Card display woes.  And I came up with this: 


This holds the cards wonderfully and it also allows me to keep them up all year long, which was one of my main goals.


I love it because I can also put up other cards, birth announcements and special photos from all year long. The cards fit in there well great, though once in a while if the card is too thin or slick I have to use a piece of tape to keep it up.

All I used for this project was a set of white shutters, some red spray paint and four picture hangers.  


This is what the back looks like - I didn't bother painting it since it wouldn't show, plus wasn't sure if the red would mark up the wall at the edges. 


The hubs added the photo hangers and hung it on the wall for me.


A few months ago I added the vinyl to the top and I think it just completes the whole area. I love to look at these photos and think about all the blessings in my life.

I actually have a second set of shutters that came with these two when I bought them. Pinterest has so many great ideas, I just can't decide how to use them! 


I'll be so sad to take down these cards as new ones come in, but it will be fun to see how each family has changed! :)

Thursday, November 7, 2013

Thankful Thursday

In honor of November and the Thanksgiving Holiday, I am changing my weekly Throwback Thursday to Thankful Thursday.


Today and everyday I am thankful for the amazing people in this photo with me!  I have been so greatly blessed to be the wife to such a wonderful man and a mom to two wonderful children.

How about you? What are you thankful for? 

(And if you have a minute, head on over here and check out our awesome photographer Kayla at Capture!  She's amazing and always gets such great shots of my kiddos!  Love that girl!) 

Thursday, October 31, 2013

Throwback Thursday

Tonight's Throwback Thursday features my Little Wildcat...who is not so little anymore!  


She's four now and loves her Wildcats almost as much as her Mom does!  Makes me so happy to hear her singing along to the K-State fight song!

EMAW! 

Homemade Halloween Costumes


Since today is Halloween (as of 30 minutes ago), I thought I would go ahead and post pictures of the kids' costumes this year. 

Since the kids were born, I've always made their Halloween costumes. I really enjoy coming up with a creative idea and seeing it move from idea to reality.  

Hannah was just a month old for her first Halloween and she went as a lobster.


It was really cute.  I put her in a big stock pot (around blankets of course) and labeled it as 'Tonight's Special'.  I threw on a chef (aka lab) coat and made a chef's hat out of posterboard and tissue paper. It was so fun to put together. She won first place at the costume contest at our town's annual Halloween event.  And after that, I was hooked. It was fun to make the costume...and even more fun for my kiddo to win!  

Since then, she's been an owl...


...a cupcake...


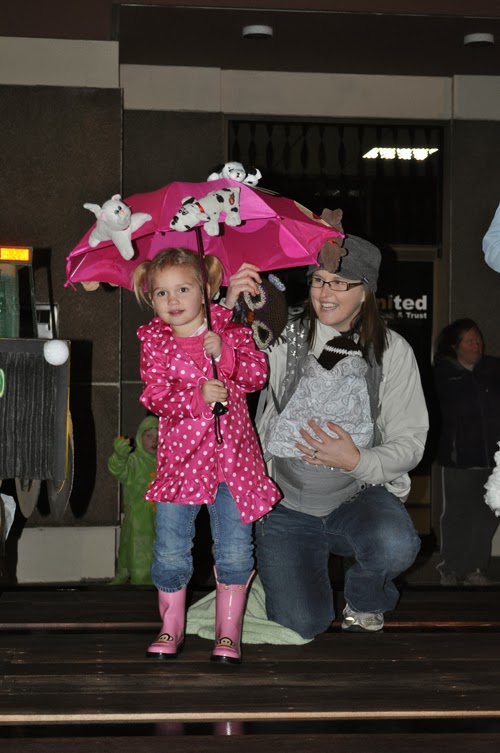
 ...and 'raining cats and dogs' (last year).


 Super cute, right?!

This year, after always choosing for her - and trying to pick the most creative costume I could come up with - I let her pick her costume. It wasn't as 'homemade' as I usually go - but it's what she wanted, so we had fun piecing it together. 

She chose to go as Doc McStuffins.  Cute, adorable doctor of toys and stuff animals. 


Isn't she cute?!


It was hard to find a simple purple and white stripped shirt, so I settled on one from Old Navy with a little pink in it.  I bought a cute pink skirt from Kohls and created my own purple, white and pink leggings with heat transfer vinyl cut on my Silhouette.


I ordered her a lab coat off of Amazon, as well as the official Doc McStuffins doctor kit. I could have let her use the one she had at home or made her something from scratch, but I was being realistic in thinking 1) It would be nice to have two doctor kits since my kids seem to fight over everything right now and 2) I'd rather spend money on something she could use over and over versus a stethoscope made from a yarn and a headband that would fall apart while trick or treating. 


Finally, I picked up the perfect headband at Children's Place, which made my daughter one happy little gal. 


I missed taking a photo of just her shoes...but you can see them below. They are glitter swirled purple Toms. A-dorable! 


Now, onto Lucas.  Since he is only one, Momma still gets to choose for him. :)  Last year (his first) he was a burrito. He always loved to be swaddled up so tight, so we made lettuce, tomato, bacon, meat, cheese, etc out of felt and used brown-ish colored felt for the burrito. Adorable. 

This year, he went as an old man.  I had found the idea on Pinterest right after Halloween last year, and as soon as I saw it, I knew that's what I wanted Luke to dress as. 

Isn't he cute?!  


I had the cordoroy pants already, and then I purchased a grey sweater at Old Navy and borrowed a bow tie from a friend.  I ordered his little glasses on Amazon and they were adorable. And he REFUSED to wear them of course....he's one.  So we tied a little chain on them and hung them around his neck. 


The hubby made the walker out of PVC pipe.


Ha-ignore my messy basement in the background. 

The wheels are actual walker wheels and the tennis balls just make it even more realistic. :)


I sewed the little walker bag and threw in a sippy cup and a remote - a one-year-old's most important accessories!  I didn't have a pattern - just kinda threw it together. If I could do it over, I would make it wider. I miscalculated when I measured how wide I could make it.


So...here's hoping they are well-behaved for trick or treating tonight. 


Feel free to share your best homemade Halloween costumes! 

Linking up to:  Sugar Bee Craft's Take-A-Look Tuesday, A Bowl Full of Lemons' One Project At A Time and the Creative Connection at Wait Until Your Father Gets Home.