Pinterest

Monday, May 12, 2014

Last Day of School Sign (+ Free Printables)


My baby girl is getting ready to finish her first year of school this week!  She absolutely loves preschool and she has learned so much since she started last August. I think she is excited for summer though - two-a-day park trips with daycare for the next three or four months - plus she can't wait for ball, the pool and a vacation to the zoo! 

So, to keep with the same theme as the First Day of School Printables I made this past August, I whipped up a Last Day of School Printable over the weekend. 


And of course, I created a whole set of them to share with each of you for Preschool through 12th Grade!  Click here to download the individual signs for both the FIRST and LAST Days of School!!  :)

All you have to do is print it out and have your kiddo hold it up, or you can put it in a simple frame like I did (mine is from Wal-Mart).  I put the year on the bottom, and you can write yours in if you'd like. It might make it easy to determine which year the photo is from later on!

In case you are curious or need a few ideas, here are a few additional school traditions we are doing:

  • These awesome first and last day of school interview set from Positively Splendid. We did one in August and I just printed out the interview for the final day of preschool.  I can't wait to see the differences between the two!  
You can download the preschool printable as well as the rest of the school years here.

  • We are also having our daughter sign her name on this small chalkboard on both the first and last days of school.  It will be so neat to see the difference that just a few months makes!  
I can't take credit for the idea - I found it on Pinterest of course! ;)

Hope you find the printables helpful!  And be sure to share with your friends!  What a great and easy way to capture these big days in your child's life!

Thursday, April 10, 2014

50 Non-Candy Easter Basket Ideas


Ah, Easter. The last holiday in the long line of candy-obsessed holidays that begin with Halloween and run through Christmas, Valentine's Day and finally Easter.

Well at our house, I guess I am the 'mean' mom that does not fill my kids' Easter baskets with candy. They get one big chocolate bunny and that's it.  Don't feel bad for them...they get plenty of candy from their grandparents, which is one of the main reasons why we don't include candy. ;)


So...I thought I'd share some of my favorite items to include in their Easter baskets that do not involve candy:
  1. Baseball Cap
  2. Bath Crayons
  3. Bike Accessories (Horn, Basket, Reflectors)
  4. Books
  5. Bouncing Balls
  6. Bubbles
  7. Bug Catching Kit
  8. Card Games
  9. Colored Pencils
  10. Coloring Books
  11. Crayons
  12. Doll
  13. Fun Socks (holiday, character, polka-dot, etc.)
  14. Gardening Tools
  15. Glow Sticks
  16. Hair Bands/Bows
  17. iTunes Gift Card
  18. Jump Rope
  19. Kids' Watch
  20. LeapFrog LeapPad Games
  21. Lip Gloss
  22. Magazine Subscription
  23. Markers
  24. Matchbox Cars
  25. Movie
  26. Nail Polish
  27. Paint Set
  28. Pajamas
  29. Personalized Pencils and Notebooks
  30. Pinwheels
  31. Play-Doh
  32. Princess Wand/Tiana
  33. Puffs (for Babies…like the Gerber kind)
  34. Puzzles
  35. Shoes
  36. Sidewalk Chalk
  37. Silly Putty
  38. Slinkie
  39. Stamp Markers
  40. Stamp Set
  41. Stickers
  42. Stuffed Animal
  43. Sunglasses
  44. Superhero Cape
  45. Swimsuit
  46. Temporary Tatoos
  47. Toothbrush
  48. Travel-Sized Board Games
  49. Water Bottle
  50. Yo-Yo
Hope that provides you with some great ideas for your children's Easter baskets this year! 

Linked up to:  Mama's Got It Together:  Pin It Party, Sugar Bee Crafts:  Take a Look Tuesday, A Bowl Full of Lemons: One Project At a Time.

Monday, March 31, 2014

One-Pan Monster Cookies


I know that I normally share crafty projects only, but I love this recipe so much that I just had to share it here on my blog. These cookies are just dying to be made by each of you! :)

Besides the easy Nestle Toll House chocolate chip cookies, this is my go-to recipe when I am craving some chocolate...or when I have to quickly whip up some cookies for a PTO Fundraiser. You can't beat a one-pan recipe that is super simple and delicious.  Oh and did I mention they are DELICIOUS?!

RECIPE:
Preheat Oven to 350 degrees
Cooking time:  20 minutes

Ingredients:  
1 stick butter
1 cup brown sugar
1 cup sugar
1 tsp vanilla
3 eggs
1 1/2 cup peanut butter
2 tsp baking soda
4 1/2 cups oatmeal
1/2 bag of M&Ms
1 bag semi-sweet chocolate chips

Cream together the butter, sugars, vanilla and eggs with your mixer.  Then, add in the peanut butter, baking soda and oatmeal and mix together until well combined.  Finally, add in the M&Ms and chocolate chips.  Some people say to mix in with a spoon - I just use my mixer, it's just easier.  (It is a pretty generous amount of chocolate - which is what makes them so yummy!) 

Spread out onto cookie sheet. 


Bake for 20 minutes at 350 degrees.  And there you have it!


Easy one-pan monster cookies!  Enjoy!

I think this kid sure did... :)


Linking up to:  Sugar Bee Crafts: Take A Look TuesdayA Bowl Full of Lemons: One Project At A Time, Skip to My Lou: Made By You MondayScattered Thoughts of A Crafty Mom:  Inspiration MondayThat's What Che Said: Monday Funday, Mama's Got It Together: Pin It Party

Sunday, March 23, 2014

Chalkboard Pantry Doors


Have you ever finished a quick and easy project, and completely underestimated the significance it would have once it was finished?

Meet my 'updated' pantry doors.


I don't have a before photo (I know, bad blogger), but just imagine the doors all the same nice wooden color as it is below.

I wanted to utilize these doors to house my weekly menu plan and never-ending grocery list. But, I knew that I didn't want to paint over the doors with any sort of chalkboard paint that I couldn't eventually remove.

As luck would have it, while browsing the back-to-school clearance at Target, I found a role of chalkboard contact paper for 72 cents.  Yep, back up and rewind. You read that right:  72 cents.

I don't have a photo of the box to tell you what kind it is, but just search for chalkboard contact paper on amazon - lots of options pop up.

I left it blank for for quite a while (actually I wrote in 'Groceries' and 'Weekly Menu'), and then of course I decided I needed to spruce it up with my trusty Silhouette.  I think the words took like a quarter sheet of vinyl, which probably cost about another 72 cents.


I might be exaggerating just a little, but for a project that cost less than $1.50, it has been sorta life-changing.  Ok, maybe not life changing...but it has definitely increased my organization...and my sanity. ;)

Each week, I fill out my menu plan while consulting my trusty family's schedule on my Erin Condren planner.  (On a side note:  seriously, if you don't have one of these things, you are MISSING OUT. Love, love, love my EC Planner!!)


Now if i can just teach my four-year-old to read, and that way she'll stop asking me, "What are we having for dinner tonight?".  Ha-Mothers everywhere are laughing at me now.

As for my grocery list, I love having a running list right there in the busiest part of the kitchen, that way I (my hubby) have no excuse not to write something down when we run out of something. Then when I am headed to the grocery store, I can just snap a photo of the list with my phone and head out the door.


Wow - you can really tell the menu plan gets used the most - huh?
No matter how hard I tried - I couldn't get it 'clean'.  Anyone have any suggestions?

Oh and does anyone else notice my M&M stash on top of the pantry!?

That hallway on right heads straight to the garage - so I see my grocery list every time I walk out the door to leave.  

See - a small project can really make a big difference!  


Anyone out there have a similar experience?  

Now onto organizing the junk drawer... :)

Monday, March 3, 2014

Personalized Fleece Tie Blanket + 'Chemo Survival Kit'


Wow. It is March already. It's cliche, but time really does fly. Seems like you plan to do something (aka blog) and then life gets in the way and you don't get it done. And honestly, since this little blog of mine is just for fun, it isn't even in my top five in terms of priorities, so it most often gets shoved to the back burner. And that is completely fine. 

In January, my mom was diagnosed with breast cancer. She's already a more than 30-year survivor of Hodgkin's lymphoma, a cancer of the lymph tissue.  Her prognosis is good, but if you are the praying type, prayers are MUCH appreciated. 


Me and my momma.  Isn't she beautiful?!

Most of you don't know me, but for those out there that do, you know that I am a 'do-er'. I never sit still and I am always multi-tasking.  Ask my hubby - I can't even watch TV without working on something else - which is why I can't keep up with what is going on in our favorite shows. I always have to keep busy, especially during times of stress. It is a control thing - when I am in 'control' of even the smallest things, I feel better. 

So, when my mom was diagnosed, I went into crazy 'do-er' mode, trying to help plan meals, rides, etc....anything I could do to make her life easier.  One of my good friends, Courtney, is also a breast cancer survivor, and I enlisted her help in thinking of all the things my mom might need as she started chemotherapy. She listed off some great ideas, but in the back of my mind, I just wanted to do something more, something personal.  

I really wanted to make her a blanket. Ever since I can remember, my mom has always been cold. It can be 90 degrees outside and my mom will want a blanket over her legs outside.  So, I thought she might enjoy a blanket she can take with her to chemo. 

Isn't it cute?  Definitely bright & cheery!


I just did the typical fleece tie blanket (if you don't know how - there are tons of tutorials online - just Google it). I've made literally dozens of these for my family and friends over the years.  


I like to make them really long (3 yards) so you have plenty of blanket at the bottom to tuck underneath your toes. :)

It is really long....it's folded several times in this photo.

It is bright and cheery, but also practical. But I still wanted it to be more.  

So...with my trusty Silhouette, I decided it would be neat to have the signatures of all of her immediate family members on the blanket so she would always have the six of us with her at all times during her treatment. 

I had each person sign a sheet of paper - my Dad, my brother, my hubby, and my daughter, who also signed my 18-month old son's name.  I scanned that sheet into the computer and traced it in the silhouette software. I thin printed it out on white heat transfer vinyl and adhered to the blanket. 

This is the result:


I put it at the top of the blanket so it would be closest to her heart. 

It might be cheesy - but I think my mom was pretty happy about it. 


In addition to the blanket, I made her a 'chemo survival kit', filled with items she might need during those visits.  I put these all in one of those awesome Thirty-One bags with all the pockets. 
  • Chapstick
  • Hard candy
  • Cough drops
  • Hand sanitizer
  • Hand lotion
  • Blank thank you notes
  • Pen and paper
  • Journal
  • Photo of her family
  • Bottled water
  • Crackers
In the bag, she can also include a book and magazines, even her computer. 
No I am not endorsed by Thirty-One, I just really like their bags. :)

Any cancer survivors or caregivers out there?  What items were helpful to you during your treatment? Mom has just one chemo treatment down and many to go, so I'd love to hear what was important to you during that time!


Linking up to:  Sugar Bee Crafts: Take A Look Tuesday, A Bowl Full of Lemons: One Project At A Time, Skip to My Lou: Made By You Monday, Scattered Thoughts of A Crafty Mom:  Inspiration Monday, That's What Che Said: Monday Funday, Wait Til Your Father Gets Home: Creative ConnectionMama's Got It Together: Pin It Party.

Friday, February 7, 2014

Valentine LOVE Shirt


I love my Silhouette for many reasons, but one of the reasons I love it the most is being able to make something when I can't find exactly what I want in the store....which leads me to today's post.

My DIY Love Valentine shirt. 

I didn't like any of the Valentine's Day shirts for little girls at our local mass retailer.  But, they did have blank white shirts that would be perfectly paired with some red vinyl.  ;)


So, I literally took five minutes, a cute font and one of this week's free shapes from Miss Kate'sCuttables and came up with this:


Heat Transfer Vinyl is super easy to use.  Just make your design in Silhouette Studio. Be sure to place the heat transfer vinyl shiny side down on your cutting mat and then mirror your image before you print. Then weed the design once it is printed. 


Then center the design on the shirt, iron and you are done!  So simple!


And this 4-year-old LOVED IT!  :)


 Happy Valentine's Day!

Monday, January 20, 2014

'Blowing A Kiss Your Way' Valentine + Free Printable!


Well here we are already half-way through January!  2014 is already flying by!  February will be here before we know it, and soon it will be Valentine's Day!  

I always like to do a handmade Valentine for the kiddos to take to daycare. And since this is Hannah's first year of school (pre-K), I thought I would try and do something a little more fun!


We found these lip whistle things on clearance at Hobby Lobby the day after Christmas. They were originally $5.99, and I think I paid right at $2.00 for them.  There are 12 in there, so that's roughly 17 cents a piece - which I thought was pretty good.


They came with some weird Santa beard - didn't use those of course. 


I made up a cute little printable to go along with them.

And then cut them down to four pieces with my paper cutter. 


I used an exacto knife and scissors to cut a whole in the middle just big enough that the whistle would fit but also wouldn't fall out. 


Cute, huh?


Let's just say the parents at Hannah's school are going to love me... :)


You can download the file here.
(I've never shared a printable before, so let me know if you have trouble downloading the file. For personal use only.)

Now to decide what to do for the little man's Valentines...

Enjoy!


Saturday, January 4, 2014

Old Dresser Turned Dress Up Clothes Station


Like many other crafters, I tend to pick up random items and pieces of furniture at yard sales with the goal of refurbishing them into something spectacular and new.  And when I bring them home, my hubby usually gives me a supportive nod...but really inside he's probably really thinking "oh lord, not another piece of junk!"  

I think that was the case when I brought home a particular dresser one evening after I stopped by a friend's yard sale.  I think I paid like $7 bucks for it.  It had been stored in a barn and was pretty dirty and had a bunch of lovely mouse pellets inside of it.  It didn't look very good, but it was sturdy - and I had big plans for it.


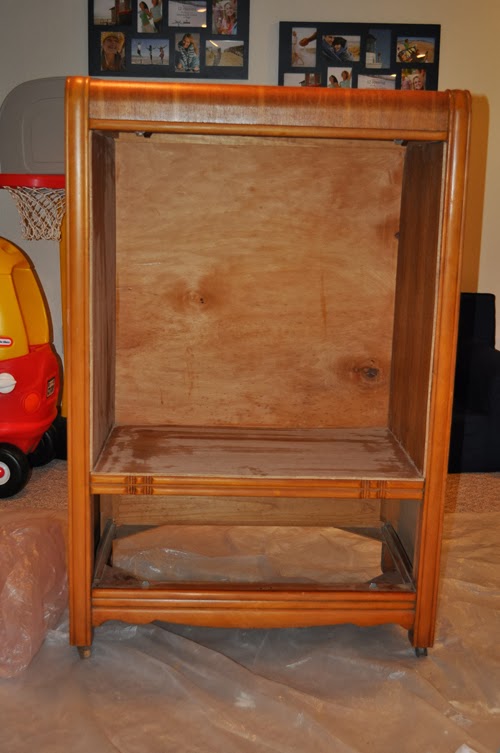
Now, I forgot to take a before picture (actually I forgot to take a lot of pictures - bad blogger), so imagine this dresser without the piece of plywood on top of the spot for the last drawer.  It started out with four drawers and we kept just the bottom drawer to hold her accessories.  (And actually I kept the other drawers....any ideas on what I can do with them?) 

We cleaned it up well with soap and water and removed the rusty old wheels off of the bottom. Then, the hubby cut down a few pieces of plywood to put around the inside to make it flat (and so nothing could fall through the dresser). 


Now we get into the fun part....the five coats of paint it took to cover this thing.  Yes, I said five coats. 

I had read about Annie Sloan Chalk paint on many of my favorite blogs. A ton of people use it and love it, because you don't have to sand or prime it.  So, that was our plan - go the easy route and use a plain white chalk paint.  Well apparently we had chosen a special dresser with an extra special varnish on it, because we did two layers of chalk paint and it just kept bleeding through. 


So, we gave up on our idea and decided to use Kilz to prime it and then cover with just a plain white semi-gloss paint.  Because we didn't paint it with normal matte paint initially, there is a little bit of 'texture' to the dresser, but honestly, it looks great regardless. Plus, this is a 'play' piece, not meant to be some fancy refurbished dresser. 

So, we (and by we, I mean my awesome husband who did all the painting while I was sick for a week right after Thanksgiving) gave it a coat of Kilz and then two coats of paint. 


Then we covered the insides and lined the drawer with this cute polka dot wrapping paper from Hobby Lobby.  We were going to use contact paper, but it was going to be a lot more expensive. Plus, I liked the idea of being able to change the look of the inside when we re-do our daughter's room in a year or two.


The next step was to add the hardware. We added a rod on the inside to hold her dress up clothes on hangers.


We also added two of these satin nickel coat hooks to either side to hold her necklaces, purses, hairbands, etc. (the ones in the middle). 


Finally, we added a satin nickel pull to the front for easy access to her princess accessories!  


And wa-la!   The final product for Christmas morning!  


She was pretty happy about getting the biggest present of the group. :)


And at it's final spot in her room! We've been having lots of dress up parties in the past couple weeks!